

今回は、RaspberryPiのネットワーク設定を紹介していきたいと思います。
多くの方がRaspberryPiをwifiに接続して操作すると思います。
今回、wifiだけでなく、Ethernetを使用した方法も紹介するので是非参考にしてください。
RaspberryPiのWifi設定
デスクトップ画面から設定する場合(GUI)
wifiの設定はほとんどセットアップ時に設定してしまうので、新規にwifiを登録したいと思った時に必要になるぐらいかと思います。
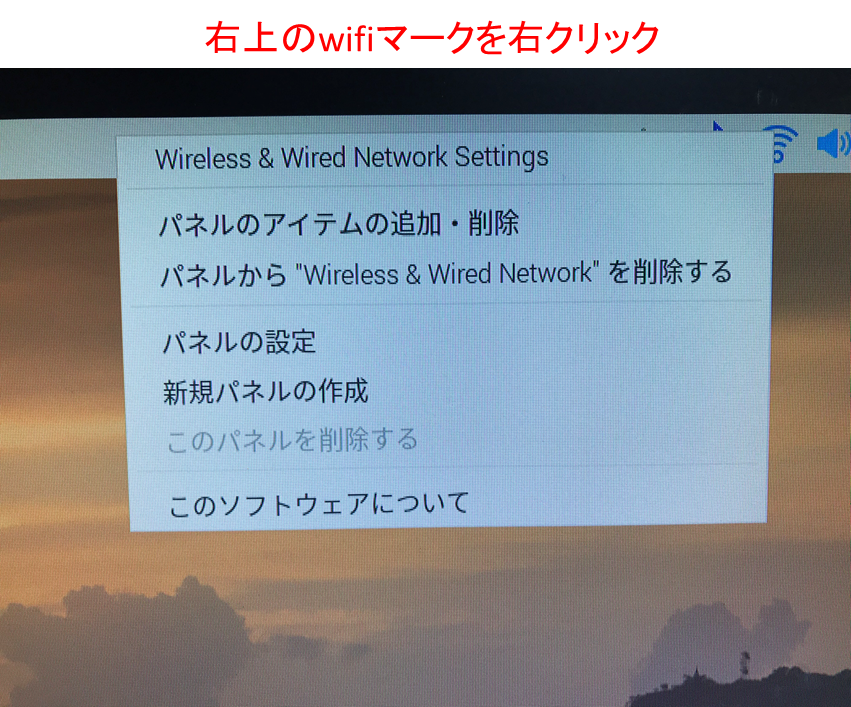
以下の画面が出てくるので、
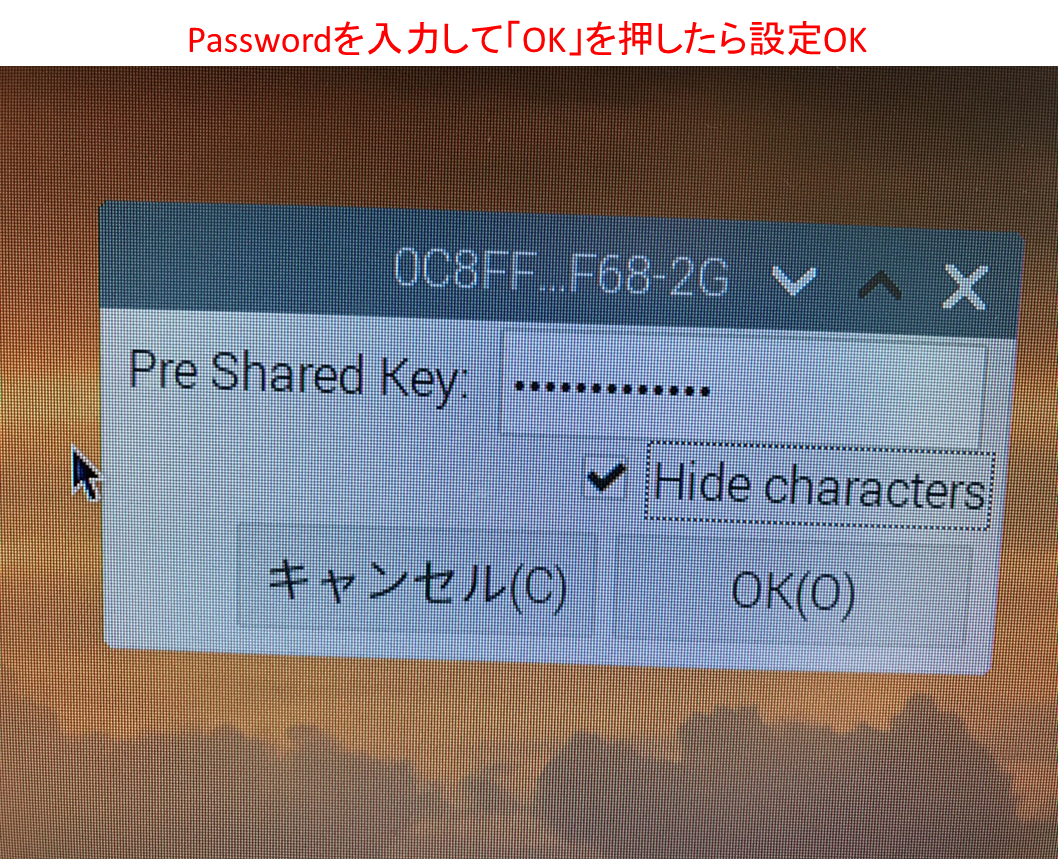
※「Automaticaly~」のチェックは外しておきましょう。

すると、パスワード入力が求められるので、パスワード入力したらOKです。
コマンドラインから設定する場合(CUI)
今度は、コマンドラインからの設定方法を紹介します。
自分は、コマンドラインからの設定の方が簡単でいいと思います。
①まずwifiスポットを検索しましょう。
pi@raspberrypi:~ $ sudo iwlist wlan0 scan | grep ESSID
                    ESSID:"0C8FFree-2G"
                    ESSID:"Freewifi1"
                    ESSID:"0C8F12DF87-5G"
②wifi設定ファイルを変更します。
pi@raspberrypi:~ $ sudo vim.tiny /etc/wpa_supplicant/wpa_supplicant.conf
ctrl_interface=DIR=/var/run/wpa_supplicant GROUP=netdev
update_config=1
country=JP

network={
        ssid="0C8FFree-2G" <==ここにSSIDを記入
        psk="55526450646823" <==ここにパスワードを記入
        key_mgmt=WPA-PSK
}
#↓別のネットワークを設定する時
network={
        ssid="0C8FFF327F68-5G" <==ここにSSIDを記入
        psk="5512697567952" <==ここにパスワードを記入
        key_mgmt=WPA-PSK
}
#入力が終了したら、保存して終了。
③RaspberryPiを再起動
pi@raspberrypi:~ $ sudo reboot
④接続確認:「ifconfigコマンド」「pingコマンド」を使用
最後に、設定ができているか、接続できているか確認します。
まず、設定できているかどうかは「ifconfig」コマンドをターミナルに入力しましょう。
wifiだけ表示したい場合は、「ifconfig wlan0」と入力しましょう。
pi@raspberrypi:~ $ ifconfig
wlan0: flags=4163<UP,BROADCAST,RUNNING,MULTICAST>  mtu 1500
        inet 162.168.4.4  netmask 255.255.200.0  broadcast 192.168.3.255
        inet6 fe80::8b91:1z1z:6441:4fbb  prefixlen 64  scopeid 0x20<link>
        ether z8:27:zb:z7:z4:68  txqueuelen 1000  (イーサネット)
        RX packets 1190  bytes 75076 (73.3 KiB)
        RX errors 0  dropped 0  overruns 0  frame 0
        TX packets 487  bytes 92827 (90.6 KiB)
        TX errors 0  dropped 0 overruns 0  carrier 0  collisions 0
次に、接続ができているかどうか確認します。pingコマンドを入力しましょう。
pi@raspberrypi:~ $ ping -c 5 162.168.4.4
PING 162.168.4.4 (162.168.4.4) 56(84) bytes of data.
64 bytes from 162.168.4.4: icmp_seq=1 ttl=64 time=0.136 ms
64 bytes from 162.168.4.4: icmp_seq=2 ttl=64 time=0.124 ms
64 bytes from 162.168.4.4: icmp_seq=3 ttl=64 time=0.098 ms
64 bytes from 162.168.4.4: icmp_seq=4 ttl=64 time=0.097 ms
64 bytes from 162.168.4.4: icmp_seq=5 ttl=64 time=0.120 ms

--- 162.168.4.4 ping statistics ---
5 packets transmitted, 5 received, 0% packet loss, time 151ms
rtt min/avg/max/mdev = 0.097/0.115/0.136/0.015 ms
これでwifiの設定はOK。
Ethernetの接続設定
Ethernetを使用して、staticにRaspberryPiを接続したい場合は、設定ファイルを書き換える作業を行います。
設定の流れは、コマンドラインでwifiの設定する時とさほど変わりません。
①「/etc/dhcpcd.conf」の設定ファイルを編集
今回はココを編集します。
まず初期設定時の「/etc/dhcpcd.conf」内容を記載します。
pi@raspberrypi:~ $ sudo cat /etc/dhcpcd.conf
# A sample configuration for dhcpcd.
# See dhcpcd.conf(5) for details.

# Allow users of this group to interact with dhcpcd via the control socket.
#controlgroup wheel

# Inform the DHCP server of our hostname for DDNS.
hostname

# Use the hardware address of the interface for the Client ID.
clientid
# or
# Use the same DUID + IAID as set in DHCPv6 for DHCPv4 ClientID as per RFC4361.
# Some non-RFC compliant DHCP servers do not reply with this set.
# In this case, comment out duid and enable clientid above.
#duid

# Persist interface configuration when dhcpcd exits.
persistent

# Rapid commit support.
# Safe to enable by default because it requires the equivalent option set
# on the server to actually work.
option rapid_commit

# A list of options to request from the DHCP server.
option domain_name_servers, domain_name, domain_search, host_name
option classless_static_routes
# Respect the network MTU. This is applied to DHCP routes.
option interface_mtu

# Most distributions have NTP support.
#option ntp_servers

# A ServerID is required by RFC2131.
require dhcp_server_identifier

# Generate SLAAC address using the Hardware Address of the interface
#slaac hwaddr
# OR generate Stable Private IPv6 Addresses based from the DUID
slaac private

# Example static IP configuration:
#interface eth0            <==ここを編集する
#static ip_address=192.168.0.10/24 <==ここを編集する
#static ip6_address=fd51:42f8:caae:d92e::ff/64
#static routers=192.168.0.1
#static domain_name_servers=192.168.0.1 8.8.8.8 fd51:42f8:caae:d92e::1

# It is possible to fall back to a static IP if DHCP fails:
# define static profile
#profile static_eth0
#static ip_address=192.168.1.23/24
#static routers=192.168.1.1
#static domain_name_servers=192.168.1.1

# fallback to static profile on eth0
#interface eth0
#fallback static_eth0

SSID 0C8FFree-2G <==wifiの設定が完了しているとここに記載される。
inform 162.168.4.4

SSID 0C8FFree-2G
inform 162.168.4.4
編集する場所を以下に示します。
# Example static IP configuration:
interface eth0 <==ここの[#]を消す
static ip_address=162.168.0.10/24 <==ここの[#]を消す
#static ip6_address=zz51:42z8:zzze:d92z::ff/64
#static routers=162.168.4.4
#static domain_name_servers=162.168.4.4.0.1 8.8.8.8 zz51:42z8:zzze:d92z::1
②RaspberryPiを再起動する。
pi@raspberrypi:~ $ sudo reboot
③接続確認:「ifconfigコマンド」「pingコマンド」を使用
pi@raspberrypi:~ $ ping -c 5 192.168.0.10
接続が確認出来たら、ssh設定をします。
pi@raspberrypi:~ $ ssh pi@192.168.0.10
pi @192.168.0.10's password :
ここでRaspberryPiセットアップ時に設定したパスワードを入力すると、WindowsやMacPCからRaspberryPiを接続可能になります。
詳しい、SSH接続については以下の記事にまとめたので、ご覧ください。
まとめ
以上がネットワーク設定になります。
次は、SSH接続を背セッティングしましょう。


コメント